Before you venture into the exciting world of sourdough baking, let me give you a word of warning: this method is not meant to be approached if you need instant gratification. Sourdough-making is a labour of love and it requires dedication, constance and patience. The mature and robust flavour of sourdough can only be obtained by proving the dough for a a very long time, and by that I mean something around 12 to 18 hours. And this is only after you have manage to create a living wild yeast…Why would anybody even attempt to make it at home then? The answer is that sourdough making is an addictive pleasure, one you may never get rid of… These days I am committed to travel 40 km to source the finest ground milled baker’s flour, I plan my outings according to my starter’s feeding schedule and I have managed to initiate several friends to this ancient ritual, so that, in the event of a cataclysm and my starter cases to live, its offering still lives in someone else’s kitchen.. You do believe me now when I said I was addicted!
First off, let’s talk about the yeast, which is the rising agent of your bread. Making your own is relatively easy, but it requires daily care and attention. The principle is that if you mix flour and water in a bowl, the bacteria in the air and in the flour will react together creating a living organism that will then be fed by those same bacteria to become strong and lively. Like all living things yeast requires regular feeds and care in order to grow healthy and vigorous. You can create a sourdough starter, which is Italian is called Pasta Madre (mother dough) in about 10 days and , if kept well, it can last forever. And I mean forever. I know of some bakeries in Italy that have been using the same Pasta Madre for centuries. Talk about legacy! Once you succeed in creating the wild yeast, you have to sustain it to help it stay alive and strong. The flavour of your bread will be determined by the strength and fermentation of your starter. The older and the stronger your starter, the better tasting you bread will be. There are many methods you can try to follow in order to create you Pasta Madre. I have read countless books and spoken to many bread-making folks and I have had many more failures than I wish to recall. This is because each yeast will be slightly different from the next, therefore you have to take all tips and advise with a grain of salt and learn to trust your instinct. The method below is relatively quick and easy and it is tried and tested by me, and produces a lovely, crusty bread. I noticed that the more mature it gets, the better loaf it produces. I am looking forward to tasting my bread in the years to come, if I don’t kill my starter, that is!
HOW TO MAKE YOUR PASTA MADRE or STARTER or SOURDOUGH YEAST (they are all the same thing…)
Day 1
In a large plastic bowl mix together 120 gr (1 cup) plain or baker’s flour with 95 ml (1/3 cup + 2 tablespoons) of filtered water at room temperature and 1 teaspoon of honey or barley malt. The sugars will kick-start the fermentation process. Cover with a lid and leave at room temperature for 24 hours.
Day 2
You will notice your dough will have risen slightly and may have already formed small bubbles. Get rid of half of the dough and add 50 gr of flour (1/2 cup) and 40 ml (1/4 cup) of filtered water.
Repeat for 8 days. Every day you will notice the starter will grow bigger and develop more bubbles. It will smell a little like a cross between lemon juice and alcohol.
Day 10 – it’s alive!
This is the day your yeast will officially be born and may be used to mix your first loaf. You need to ‘refresh’ it and give it strength and vigor for your bread to rise. In simple terms, you need to feed it.
First feed
As soon as you wake up in the morning, discard 100 g of the ferment then add 2/3 cup (100 g) plain flour and 90 ml water. Cover with a lid and rest for 3 hours.
Second feed
Feed your ferment 2/3 cup (100 g) plain flour and 90 ml water. Cover with a lid and rest for 3 hours.
Last feed
Feed your ferment 2/3 cup (100 g) plain flour and 90 ml water. Cover with a lid and rest for 3 hours.
After it has rested, your yeast will look healthy, airy and full of bubbles (in colder climate this may take longer than 3 hours). It will have a slightly sour, yet pleasant smell. Congratulations! You have succeeded in making a living wild yeast. You can now use it to mix your first loaf.
How to maintain your lievito madre
The wild yeast you have created will happily live in your fridge, stored in an airtight plastic container. You will have to feed it at least once a week to keep it healthy and alive. If you don’t have time to mix a loaf, but only need to give your starter some dinner, rest it at room temperature for 30 minutes, then discard one third. Add 1/3 cup (50 g)/4 tablespoons plain flour and 40 ml (or 2 tablespoons) of filtered water (at room temperature) for every 100 g of yeast you have left (aim to always have at least 100 g yeast in your container). Mix with a wooden spoon or a chopstick, cover the container with its lid and stick it back in the fridge until next time. A well-kept yeast will live a long, prolific life. Some Italian bakeries are known to be using centuries-old lievito madre. As a rule of thumb, the older your yeast, the more flavoursome your bread will be. No wonder sourdough bread is so good!

SOURDOUGH LOAF RECIPE (Pane di casa):
240 gr (1 cup) starter
500 gr (4 cups) organic flour
300 ml (1 cup 1/4) filtered water
6 gr (2 teaspoons) of salt
A teaspoon of honey or barley malt (optional)
1. Mix flour and water in a large ceramic or plastic bowl with a wooden spoon, and let it rest for about 1 hour. This process is called Autolayse and it allows for flavour and texture to develop. It is not a mandatory step, but I recommend it.
2. Add your starter and knead for about 5 minutes, then add salt and honey , if using any. Knead well for about 10 minutes, until your dough is smooth and silky.
Shape it into a ball and let it rest, covered, for 20 minutes, then stretch it gently with your hands to form a rectangle and fold into three. This process will give your dough strength and texture.
3. Cover with oiled cling wrap and let it prove in a warm place for 3 to 4 hours.
Kead again, gently, for a minute , fold into three and shape into a ball and then place it a proving basket or a colander lined with a tea towel and dusted with semolina. Rest it the fridge covered, with a moist cloth, to slowly prove for 12 hours. I normally put it in the fridge at night before dinner and forget about until the next day. You can leave it to slow prove in the fridge for a few days, if you wish so. This process is called Retardation and it will develop the fermented flavour of the crumb and the characteristic crunchiness of the crust.
4. The next morning, leave your dough at room temperature for at least 2 hours. It should grow in size by 1/3 third.
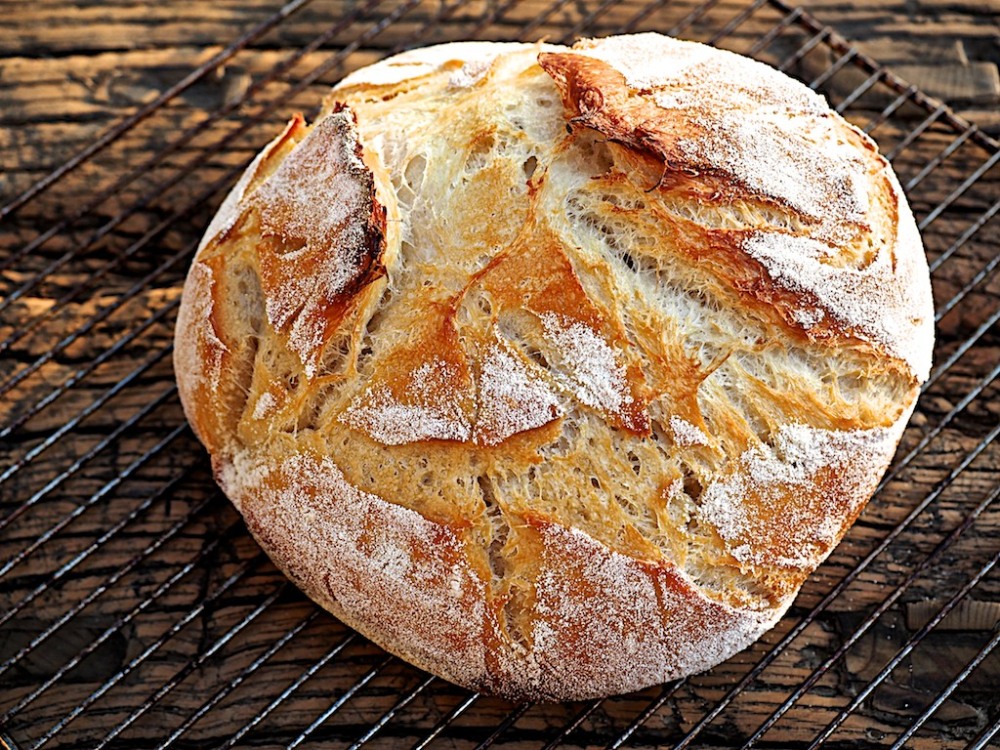
 5. Preheat you oven to 200C (390 F). Place a small metal bowl in the oven to heat up. Gently, turn the bread onto an oven tray lined with baking paper, sprinkle it with a little water and score it in a X pattern. Immediately insert the tray into the even, pour a cup of cold water into the metal bowl to create steam and close the oven door. Bake for 30-35 minutes or until crusty and bronzed, the bottom sounds hollow when tapped and the fragrance of freshly baked bread is intoxicating. Rest at room temperature for at least 1 hour before slicing.

Silvia’s Cucina is on Facebook , Twitter and Instagram
Silvia’s Cucina the cookbook is now available in stores and online!

Related articles
- Sourdough Starter (mizrhi.wordpress.com)
- October 16: World Bread Day! (bewitchingkitchen.com)
- My Sourdough Starter: Late Nights With Yeast (booksinthekitchen.com)
- Sourdough – Make you own Starter (jamesbonfieldrecipes.wordpress.com)

Thank you so much for your blog, I am currently on holidays and have just started my own sourdough starter. Fingers crossed I will be making my own bread in a couple of weeks. Reading through your recieps have really inspired me to give bread making another go, as there really is nothing better then the smell of fresh bread or the taste.
Oh, I’m so glad you got back into baking bread! I agree, there is nothing quite like the frabgrancy and the aroma of freshly baked bread. let me know you go with your starter!
Thank you so much for the sourdough recipe!! My starter turned very nice and I made my first loaf. I am so happy and proud about it! I am just not sure about how to look after it during the time that I don’t use it. Let’s say I don’t use it for one month. I understand I need to feed it once a week, to keep it alive. This part is where I am bit confused. I kept about 2 Tbsp of my starter in a jar in the fridge. Now, to feed while I don’t use it, is it correct to proceed as follows: take the starter out of the fridge, feed, stir, let it raise outside the fridge, get rid of most of it, close and put it back in the fridge until I want to activate again? Thanks for your great help, Silvia!
Monica, sorry for late reply, for some bizarre reason your message ended up in the spam filter…
When I don;t have time to use my starter, I keep it in the fridge. Then, once a week, I take it out, sit it at room temperature for 30 minutes or so, discard 1/3 and give it a feed. Then back in the fridge until next time. Hope this helps!
Hi Silvia,
I have made my pasta madre and planned to start my first loaf today, I have been feeding it each day but am worried (on so many fronts and it’s only bread!!!!).
1. It is quite goey
2. There is quite a lot of it! Monica posted that she has 2 tablespoons in the fridge. I have over a cup!
Have I done it wrong? Should I start again? I think it smells right…
I don’t want to poison my boys… Yikes, is that even possible?
I don’t really want to start again, I want to eat sourdough!
What do you think?
Cheers
Mel
Mel, so sorry about the delay of this reply. I hope all’s ok in sourdoughland!
You are doing just fine!
1. Gooey is good. As long as it looks bubbly and “alive” after you feed it, you are fine.
2. You should always aim to have at least 1 cup in the fridge.
It looks to me you are doing a great job!
Have you used it for baking yet?
Please, keep me posted and email me at silviacucina@gmail.com if you need extra help, or if you want to send me some pictures of the starter, for me to see how it’s going.
Ciao!
I’m very new to bread baking and have two questions:
“Day 10
Get rid of half of dough and add 100 gr of flour (2/3 cup) and 90 ml (1/3 +1 tablespoon) of water. Feed again after 4 hours.”
Does “feed” mean to repeat the previous sentence “Get rid of half of dough and add 100 gr of flour (2/3 cup) and 90 ml (1/3 +1 tablespoon) of water.”?
and
“Now that you have created your yeast, you have to make sure you keep it alive and healthy by feeding it at least one a week (125 gr of flour and 65 gr of water for 125 gr of starter). ”
When you talk about “feeding” it here, do you still throw away half of the dough before adding in the new flour and water?
Thanks for clarifying! I’d hate to get this far in the process just to mess it up
Dear Jessica, thanks for your message and congratulation on attempting making sourdough! I’m glad you pointed out that the wording was a bit unclear. As English is not my first language, it is important that I try and give clear instructions on tricky methods. I have now amended it so that it should be easier to follow.
Day 10 – it’s alive!
This is the day your yeast will officially be born and may be used to mix your first loaf. You need to ‘refresh’ it and give it strength and vigor for your bread to rise. In simple terms, you need to feed it.
First feed
As soon as you wake up in the morning, discard 100 g of the ferment then add 2/3 cup (100 g) plain flour and 90 ml water. Cover with a lid and rest for 3 hours.
Second feed
Feed your ferment 2/3 cup (100 g) plain flour and 90 ml water. Cover with a lid and rest for 3 hours.
Last feed
Feed your ferment 2/3 cup (100 g) plain flour and 90 ml water. Cover with a lid and rest for 3 hours.
After it has rested, your yeast will look healthy, airy and full of bubbles (in colder climate this may take longer than 3 hours). It will have a slightly sour, yet pleasant smell. Congratulations! You have succeeded in making a living wild yeast. You can now use it to mix your first loaf.
How to maintain your lievito madre
The wild yeast you have created will happily live in your fridge, stored in an airtight plastic container.You will have to feed it at least once a week to keep it healthy and alive. If you don’t have time to mix a loaf, but only need to give your yeast some dinner, rest it at room temperature for 30 minutes, then discard one third. Add 1/3 cup (50 g)/4 tablespoons plain flour and 40 ml (or 2 tablespoons)of filtered water (at room temperature) for every 100 g of yeast you have left (aim to always have at least 100 g yeast in your container). Mix with a wooden spoon or a chopstick, cover the container with its lid and stick it back in the fridge until next time.
This is such a great blog!!! Really makes me hungry just reading and looking at the pictures : ) I recently baked my first loaf of bread and it was incredible!!! I used a starter my friend told me about. It’s from Sourdough’s International and now I have to spread the word! I loved it. Definitely going to order more when it comes the time.
Thanks Rachel1 I’m glad to know you are a fellow avid baker!
Silvia, thank you for your wonderful blog. I have also just bought your cookbook and am working my way through the deliciousness!
I have started making sourdough after many unsuccessful attempts a few years ago – thanks to your great recipe and instructions I now have a lovely, active starter.
I have a question on the amount of flour I add whilst kneading (by hand). I have read that you shouldn’t add too much, however I am adding approximately one cup. I find it impossible to knead without adding this as it is so sticky. Do you have any suggestions?
Thanks again for such beautiful recipes!
Jennifer
Hi Jennifer, thanks for your kind words! I hope the bread turned out ok!You will soon learn that each loaf requires a little adjusting. Flour can vary from packet to packet, even within the same brand! Sometime you will need a little extra, other times a little less. Let me know how yo go!
Silvia
Hi!
Beautiful blog and I got real excited to make the starter. However, the starter isn’t real liquid-y, it looks more like a wet dough. Is that alright to start of with?
Cheers! El
Hi there! Yes, it’s fine that is is a wet dough. As long as it’s sticky and not stiff, you will be fine.
I’m just reading through to feed my curiosity about making sourdough (it’s one of my to-make items!) for the first time and I notice this “Add 1/3 cup (50 g)/4 tablespoons plain flour ” for feeding after day 10.
I don’t understand what “1/3 cup (50g) / 4 tablespoons” means. Do you mean 1/3 cup (50g) “OR” 4 tablespoons, or do you mean 1/3 cup (50g) AND 4 tablespoons. or literally does it mean 1/3 cup (50g) divided by 4 tablespoons??
Look forward to the clarification.
Thanks.
Hi Dora, I try to give measurements in both metric and cup (and sometimes tablespoons!) to make sure everyone understands. You either add 1/3 cup, or measure 50 gr, or use 4 tablespoons.
Hope this helps!
Silvia
Thanks! I’ve recently started your schedule and I’m on day 5. My starter was super bubbly yesterday but today it’s less and more liquid batter like. Is that right? Should I keep feeding once a day?
Yes, Dora, keep feeding it one a day until day 10. You are doing well. just to make sure, before you feed it, do you discard half of it?
Hi Silvia,
I watched you making your Spelt Ciabatta the other night, it looked fabulous so had to try it. While looking for your recipes came across this sourdough….so today my Pasta Madre will be conceived. 🙂
I did have a question but think you have answered it in your last comment. For the first 9 days I should discard half the dough before feeding, correct?
Love your show on SBS, though I must admit I was disappointed to see you have a wedding ring. Never mind…..maybe you have a sister??
Ciao.
Hi Silvia
the other night you made Spelt Ciabatta on your show and I was inspired to give it a try. Looking for your recipe came across this great blog and your sourdough recipe, so today, my Pasta Madre will be conceived!
I do have a question though think you have answered it in your last comment. In the first 9 days before feeding I must discard half the dough….correct?
Love your show on SBS, you live a charmed life. Though I must admit I was disappointed to see you have a wedding ring. Never mind…..maybe you have a sister? 🙂
Ciao.
Dear Silvia, why does sourdough need to slowly prove in a basket or collander?
Hi Silvia, I love your show on SBS and have your cookbook too!
I have tried making a sourdough starter before but without success. I’m now on Day 9 in creating the starter using your method, and I’m delighted by the result so far.
I’m confused though as to what to do, after I make my first loaf.
Once on Day 10 and the starter is fed 3 times, I can then use it for my bread, but do I then take some of that bread to keep the starter going, or add more flour to the starter, once it’s been used ? I’m not sure what happens after, and it’s not clear to me in the instructions. I’m not sure I’ve missed something.
Thanks
You are doing great. Keep feeding it! When you use it to make bread, make sure you leave at least 100 gr of starter on the container, feed that with flour and water to keep it going and use it again.
Good luck
Thanks for getting back to me so quickly! Okay, so I add more flour & water (as per days 2 to 9?) to keep it going, and then when I make bread again, do I feed as per day 10 – i.e. before using it for another loaf?
Hi Silvia thanks for this inspiring recipe. I have a few questions please regarding:
Day 2 – 8 and all 3 feeds:
Q: after I add the flour and water do I stir it through with a spoon or just add and leave? and do I cover the bowl from day 2 – 8?
Thanks so much.
yes, always stir and cover!
Hi Silvia, I was hoping you could please help me as I have found when I have tried baking the bread it has not been cooking all the way through (i tried first time for 30 minutes and then again for an hour). Does the dough need to go straight on a rack in the oven or onto a tray? Thanks in advance I have been loving following your recipes xx
The best way to know if your bread is cooked though is to tap the bottom. If it sounds hollow, it’s cooked. Rest on a wire rack until cool.
Thanks Silvia I am going to have another crack this weekend xx
Hi Sylvia, I have a sourdough starter and have made several loaves using your recipe above, but cant’t get the colour on the top the same as the bottom. The bottom colour looks like your loaf pictured above, but the top is more a duller brown colour, not the same. I have a couple of pics that I could send but not sure where to send them to. Do you have any advice? Kind regards, Julie
Hi do ì have to refresh my starter when its been dormant in the fridge other than feeding weekly as in 1st.2nd and third feed when i want to bake a loaf or use it as is straight out of fridge cheers
You need to refresh it/feed it, before you can use it.
hi silvia im a bit confused on how to refresh the dormant starter that I am now ready to use for another loaf I understand you have to feed it weekly but not sure what to do when ready to bake
When it’s ready to use for baking you will see it’s very lively and full of bubbles. It it isn’t , feed it a bit mote and wait until it’s ready.
This recipe is fantastic. I began my starter last Sunday. It was fully active yesterday, so I decided to try this recipe first. I was skeptical about the refrigerated rise, but the results were perfect.
So happy to read this!!
Great fun making this. My second try at a Sourdough Bread. Photo here…https://scontent-ort2-2.xx.fbcdn.net/v/t1.0-9/30221996_10211052537131726_7010336377485131776_n.jpg?_nc_cat=0&oh=d19f2fa7d5d79b6d7bbc303a9e6578bb&oe=5B2972AB
Wow!
I started my Sourdough Starter today. I stuck rigidly as per this recipe for day 1 . However, my mixture became doughy though sticky. But not pliable or liquified enough to produce bubbles. Can someone point out to me what I am doing wrong. Thanks
Just add a little water. Flours are all slightly different and sometimes tweaks are necessary
Thank You.
Hi Silvia, I just wanted to say thank you for the starter instructions. I have tried SO many times in the past with no success. I’ve tried everything, but it seems the ONE thing I was missing was the honey. That had my starter bubbling and frothing by day 2. I was AMAZED! Thanks so much, I look forward to making my bread soon.
I am so excited for you! It’s my favorite activity!!
Silvia, I’ve been making your bread from this recipe for about 5 years now, with reasonable success. As I’m such a sourdough fanatic I keep being given other recipes and books; most seem to say to feed the starter twice in the 24hours before baking a loaf – your recipe i’ve taken to be use the pasta madre and then feed it ready for next time. I would greatly appreciate your thoughts on this (I must say the ‘feed before’ recipes are very very time consuming compared to yours!!) regards Corinne
I have to agree with your other sources, better to feed the starter before using it!
Hi Sylvia, can you use rice malt syrup instead of barley malt as I can’t get barley malt syrup? Or is honey better to use. Regards, Julie
Absolutely!